Slow braised pork tagine with cauliflower couscous and apple yoghurt

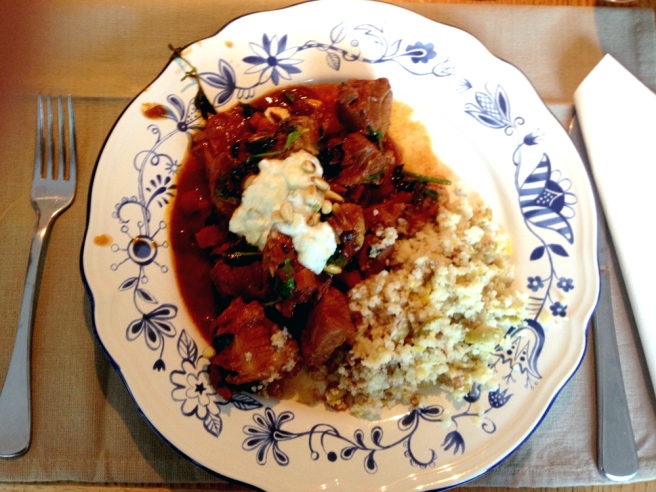
Dad cooked this for dinner the other day, it was so tasty that he wanted to share it with you. He has adapted it to suit his Paleo Diet by substituting the couscous with ‘cauliflower couscous‘ and has lost about 12 kilos so it’s definitely worth a try!

photo-5

Adapted from Hollick Wines

For the slow braised pork

  • extra virgin olive oil
  • butter
  • 2 brown onions (peeled and sliced)
  • 2 cloves chopped garlic
  • 1 heaped dessert spoon ras el hanout spice mix
  • 1 dessert spoon ground cumin
  • 1 teaspoon ground tumeric
  • 1 teaspoon smoked paprika
  • 2 carrots (diced)
  • 1 stick celery (diced)
  • 12 green beans, sliced lengthways
  • 1 long red chilli sliced
  • 6 fresh dates, roughly chopped
  • 2kg pork shoulder (cut into large cubes)
  • 1 litre crushed tomato
  • 1 litre chicken stock
  • 2 bay leaves
  • ½ bunch coriander (chopped)
  • ¼ bunch basil (chopped)
  • ½ bunch Italian parsley (chopped)

For the cous cous

  • 1 cauliflower
  • 3 cups chicken stock
  • ¾ cup green olives (chopped)
  • zest of half a lemon
  • butter
  • extra virgin olive oil
  • sea salt

For the apple yoghurt

  • 2 cups natural yoghurt
  • 1 large granny smith apple (diced)

Method
Heat olive oil and butter in a large pot. Add the onion, garlic, ras el hanout, cumin, tumeric, smoked paprika, diced carrot, diced celery, green beans, chilli and dates. Fry until fragrant and vegetables are starting to brown.
Add the pork and stir well to ensure it is coated with the spice and vegetable mixture.
Add the crushed tomato, chicken stock and bay leaves. Bring to the boil and then reduce heat and simmer for 45-60 minutes or until pork is tender. Stir in the chopped coriander, basil and parsley just prior to serving.

To make the cauliflower cous cous. There are a few ways to cut a big head of cauliflower down to couscous size. You can go at it with a chef’s knife until the cauliflower is chopped to tiny bits or you can pulse the florets in a food processor to break them down. You can also grate the cauliflower spears on the big holes of a cheese grater.

Bring the chicken stock to the boil. Pour the chicken stock over the cous cous. Add the butter and the olive oil and cauliflower and saute for a few minutes until just cooked.
Add the lemon zest and green olives. Stir well and taste. Season with sea salt if necessary. Set aside and reheat before serving.

For the apple yoghurt. Combine the yoghurt and diced apple. Mix well.
To serve. Serve the slow braised pork accompanied by the green olive and lemon cous cous, a generous dollop of the apple yoghurt and a sprinkle of toasted almonds
Enjoy with a glass of Hollick Tempranillo (of course)

Flapjacks – the M&S kind

Image

Flapjacks (the English kind, not the pancake kind) have been a hot topic lately. The discussion started at “Why don’t Australians know what flapjacks are?” and turned to sharing recipes and of course a debate about plain vs fruit flapjacks.

I decided to give them a shot, with some guidance from Jen who shared her flapjack recipe with me. They are dead easy to make, however I blasted mine in the oven (as I do with everything) and they turned out crispy rather than chewy. I also found this article in the Guardian on how to cook the perfect flapjacks so I have a few tips to take onboard for next time. And there will be a next time. Oh yes.


Jen’s Flapjacks

  • 200gm butter
  • 6 tablespoons of golden syrup
  • 80gm Demerara sugar
  • 350gm oats

Mix the oats and sugar in a bowl. 

Melt the butter and golden syrup together and add to oat mixture

Press into a lined baking tray (approx 1 inch thick) and bake in a moderate oven for 25 mins.

Flapjacks recipe


Shakshuka – at Grandma’s Little Bakery

Shakshuka – at Grandma's Little Bakery

–Traditional eggs cooked with our popular tomato & capsicum base served on a hot pan with Grandma’s bread.

I went to Grandma’s Little Bakery in Collector, NSW for the first time on the weekend and really enjoyed it.  The menu is very interesting with Italian, British, Middle Eastern dishes. We went for brunch so of course I couldn’t go past the baked eggs.  I will definitely go back to Grandma’s. It’s only 45 minutes out of Canberra, I might even pop in on the way home from Sydney.

Quick and easy: Apple and berry after-work cake

Last night the sisters watched an episode of Donna Hay’s “Fast Fresh Simple” before heading over to the parents for dinner.

She baked her grandmother’s easy apple and berry cake, which looked delicious – so we decided to give it a crack. To say that she is a precise cook is an understatement, she actually brought out a ruler during one recipe to measure pastry – I’m sure the she would go into a fit if she saw our messy “rustic” attempt at her cake. And here it is!

Image

ImageThe final product

Donna Hay’s quick and easy apple and berry cake

  • 1 1/2 cups self raising flour
  • 3/4 cups castor sugar
  • 125gm butter, softened
  • vanilla
  • 2 eggs
  • 1/2 cup milk
  • 1 apple, sliced
  • 3/4 cup blueberries
  • raw sugar, to sprinkle on top

Method:

Beat all of the ingredients apart from the apple and blueberries in a mixer.

Pour cake batter into a lined springform cake tin

Scatter the apple and berries on top

Sprinkle with raw sugar and pop into a 180 degree over for around 45mins.

(note: this was baked in mum’s super duper fan forced oven, so we baked it at 160degrees)

Lazy Sunday: Aunty Vicky smoked trout tart (with a spelt crust!)


Thought I’d quickly write down the recipe for a little something I made up on Sunday. It’s called the “Aunty Vicky tart” because it reminded us of Fred’s aunty. Funny that?

This recipe evolved as I remembered reading somewhere that in France you should always use creme fraiche in a quiche rather than cream. I also wanted to attempt to make a spelt pastry using Maggie Beer’s sour cream pastry recipe. Put the two together along with some leftovers in the fridge and you’ve got a smoked trout tart!

Why spelt? I’ve been making these fantastic spelt crackers by Jill Santopietro and have a load of spelt flour in the cupboard. Surprisingly, I’ve loved everything that I’ve made from spelt thus far! I used wholemeal spelt, however you could use white or mix it up – I’ve also mixed it with coconut flour with a good result …

Tip: As usual my measurements aren’t very exact. Basically I bought a small carton of sour cream, dished out 2 tablespoons for the pastry and used the remainder in the tart – hope that helps!

SPELT PASTRY (LOOSELY ADAPTED FROM MAGGIE BEER)

1 cup of spelt flour of choice (I used wholemeal spelt)

1 large tablespoon of butter

2 generous tablespoons of sour cream

iced water

salt

Rub the butter into the flour until course breadcrumbs form.

Add in the sour cream and salt. Mix together, then add iced water until the mixture forms a soft dough, similar to play dough.

Roll out into a thin round, directly on to your baking paper then plonk the whole thing into a tart tin or a cake tin.

Blind bake in a 180 degree oven for 15 minutes.

AUNTY VICKY SMOKED TROUT TART

1 smoked trout

250mls of sour cream (or the remainder of your carton or tub used for the pastry)

4 eggs

Half a bunch of thyme

Salt and pepper

Half a red onion, diced

Parmesan cheese, grated (or cheese of your choice)

Squeeze of lemon

Lightly whisk the sour cream, eggs and salt and pepper in a bowl.

Remove skin and bones from trout, then flake into the egg mixture.

Add thyme, onion and cheese to your liking.

Pour the mixture into the cooled pastry case. Top with more cheese and herbs if you wish.

Bake in a 180 degree oven for around 25 minutes.

Make your own coconut milk at home

Inspired by our recent trip to Thailand, I was taken by the importance of fresh coconut milk in Thai cooking – you can taste the difference! David Thompson also stresses this too in his Thai Street Food book so I thought I’d give it a go. David’s recipe uses fresh coconut but unfortunately there were no coconuts to be seen, so I used shredded coconut instead.

In a nutshell, shredded coconut (bought in a huge bag from a Thai shop in Chinatown), cover it with hot water and allow to soak for 10 mins. Blend. Strain.

Fresh coconut milk (no excuses!)

Ingredients:

2 cups of shredded coconut

3 cups of hot water

Have on hand:

blender

muslin or cheesecloth


The desiccated coconut and hot water mixture

Step 1: Soak

Cover the shredded coconut with hot water. I used a half/half mixture of boiling water from the kettle and water from the tap. As you can see, the coconut soaks up all of the water! (don’t worry, it’s still there – but difficult to see in this photo)

Step 2: Blend

I blended it for around 5 minutes with our crappy stick blender. I just blended until I could see a coconut cream like liquid forming in the bowl.

Makeshift cheesecloth strainer

Step 3: Strain.

Eek! Got to this stage of the recipe and realised I needed cheesecloth! In lieu of having cheesecloth or muslin at hand (or even a clean chux!) around – I strained the mixture in a calico bag. As you squeeze and squeeze it’s rewarding to see actual coconut milk pouring in to the bowl.

(at this stage I can hear David Thompson crying in disgust, as I’ve used a metal bowl – which isn’t recommended. I didn’t leave it in there for long though, it didn’t seem to have an effect on the final result)

The final result - glossy coconut milk!
The final result – glossy coconut milk!

Step 4: Settle

Leave the mixture for around 20 minutes and watch the coconut cream form on top. I scooped the creamy part off the top of the mixture into a jug and used it in both the curry and some sticky rice for dessert.

Leave it to settle and allow the cream to form on the top

And there you have it peeps – coconut milk! Not as easy as opening a can, but it tastes 100 times better than the inside of a can ☺

My handy tip: use a proper blender and cheesecloth and you could easily whip up a batch in 30mins including soaking time.

Momofuku Pork Buns … well, kinda

Our oven has been on the blink for a week or so, therefore when the opportunity came up to cook in a nice kitchen – I jumped at the chance and decided to whip up Momofuku’s pork buns.

Or at least, attempt to. A couple of things went ever so slightly pear-shaped during the recipe, however nothing major enough to stop us from chowing them down.

The Dough

I followed the bun dough recipe in Kitchen Musings, which I adapted after running out of time and needed to feed the hungry masses. I ended up skipping the final proving step. Not sure if this made a difference, but I did find that when steaming the buns, they puffed up uncontrollably! This could partially have happened because I didn’t roll them out with a rolling pin but shaped them into rounds by flattening them with my hands.

The Pork

It was near-impossible to find pork belly on Saturday (in the depths of Canberra, anyway) so I substituted these with pork strips. I didn’t follow a recipe for the pork, but adapted it from a recipe I saw on Gok Wan’s cooking show of all places!

Heat the oven to very hot (around 230 degrees)

Lay pork strips, or belly if you have it, in a roasting dish

Drizzle with olive oil and sprinkle liberally with coarse salt, white pepper and chinese five spice powder. Strangely enough this was the only photo I could find of the pork.

Chuck them in the oven and cook until they are brown and the skin has crackled up nicely, then splash them with a cup of shao sing wine, cover with foil and turn down the oven. After around 40 mins take the foil off and bump up the oven for 5 minutes or so to crisp up again.

After this I drizzled them with sesame oil and wrapped them in foil to rest. Actually I only did it as I had a 15 minute car ride. All in all they rested for around 35 minutes but came out both tender and crispy!


Steamed buns
makes 50 buns

1 tablespoon plus 1 teaspoon active dry yeast
1 1/2 cups water, at room temperature
4 1/4 cups bread flour
6 tablespoons sugar
3 tablespoons nonfat dry milk powder
1 tablespoon maldon sea salt
Rounded 1/2 teaspoon baking powder
1/2 teaspoon baking soda
1/3 cup melted butter

1. Combine the yeast and water in the bowl of a stand mixer fitted with dough hook. Add the flour, sugar, milk powder, salt, baking powder, baking soda, and fat and mix on the lowest speed possible, for 8 to 10 minutes. The dough should gather together into a neat ball on the hook. When it does, oil a medium mixing bowl, put the dough in it, and cover the bowl with a dry kitchen towel. Put it in a warm place and let rise until the dough doubles in bulk. (they say an hour 15, but I’d say I took 40 minutes)

Image
2. Punch the dough down and turn it out onto a clean surface. Divide the dough in half, then divide each half into 5 equal pieces. Gently roll the pieces into logs, then cut each log into 5 pieces, making 50 pieces total. They should be about the size of a ping pong ball and weigh about 25 grams, or a smidge under an ounce. Roll each piece into a ball and leave to rise for 30 minutes. (I took around 15 mins)

Image

3.  Making the folded bun. Flatten one ball with the palm of your hand, then use a rolling pin to roll it out into an oval. I didn’t have a rolling pin, so I just flattened them with my hand, rubbed a bit of oil on them and folded them over.

I wouldn’t really recommend doing this in the future as they weren’t thin enough. They look quite funny, don’t they?

4. Steaming. Set up a steamer on the stove. Working in batches so you don’t crowd the steamer, steam the buns for 10 minutes. Remove the parchment. You can use the buns immediately or reheat them for a minute or so in the steamer if necessary.

At this stage, we left my sister’s house and took everything over to mum and dad’s place.

Assembling the pork buns

I reheated the pork buns, which may have actually saved them as I think they were under cooked at the time. My sous chef Fred was on assembly duty whilst I was busy steaming. He sliced some cucumber, chilli and the pork. He put a dollop of hoisin on the bun, a slice of pork, spring onion, chilli and Srichacha sauce.

The Result

In a nutshell, capital T for TASTY! I’d definitely make them again, but wouldn’t recommend taking as many shortcuts. Either way, I’ll definitely be heading back to Momofuku for the real thing!

Damn tasty and worth the effort if you can be bothered! We were missing the pickled vegetables but they were still a crowd pleaser. Tick that one off the list!

A Duck Duck Goose love affair

Wow, it really has been a while since my last post (I’ve been working on big project here in Sydney) as well as a wedding invitation design for a special person. Which in turn reminded me of the most fantastic food we had at our wedding down in the South Coast, NSW thanks to the awesome caterers at Duck Duck Goose Catering.

The very lovely chef Josh and his gorgeous wife Corinne made our wedding day even more fantastic, with their gourmet bbq. It also helped that they were super chilled with our tough foodie crowd. Without even tasting the food, we just met them, told them what we wanted and warned them that it was a tough crowd. We opted for mixed seafood platters, antipasti plates, barbecued meats in a selection of marinades and a fantastic mix of salads.

On the big day, they breezed in super cool, calm and collected – and churned out what would have to be some of the most fantastic wedding food we’d tasted (of course, I’m completed biased! and still baffled as to how they produced such delicious food out of a tiny kitchen along with a couple of bbqs?)

If you’re planning a wedding around the South Coast, I’d highly recommend them. www.duckduckgoosecatering.com.au

The product of months of scouring through Rozelle markets 🙂
An epic cheese platter, sourced through a secret cheese connection in Sydney
A tower of meringue, marscapone and summer berries to top off the night!


After a long break: Delicious pea and ham ravioli

It’s been a while, hasn’t it? Inspired by a visit to Momofuku Seiobo, I tried to recreate the flavour of their pea and ham agnolotti. Truly one of the most delicious meals I’ve had in a long time.

Equipped with only a packet of frozen peas, a piece of smoked speck, some wonton wrappers and the manchego cheese already in the fridge – I ended up with what was quite a tasty dish in the end! Here’s the recipe …

Pea and ham ravioli

1 cup of peas

3 cloves garlic

3 tblspns milk

Butter

Salt, pepper and nutmeg

1 packet of wonton wrappers

Smoked speck, cut in to small cubes (around half a centimetre in size)

Parmesan cheese, although I used manchego

Method

1. Melt the butter in a pot. Add peas, garlic and milk and saute until soft. Add pepper, salt and nutmeg to taste. Blend in a food processor until smooth, then chill in the fridge for an hour. (Afterthought: I think I added in a scoop of marscapone at this stage?)


2. Now it’s time to assemble the ravioli. Drop teaspoons of mixture on to a wonton wrapper. Brush the edges and seal. Rest the ravioli on a sheet of baking paper.


3. Fry the ham in a pan until lightly browned. Melt some butter in a pan until frothy (I prefer salted).


4. Boil the ravioli in a pan of salted boiling water. Once they float to the top, scoop them on to warmed plates and drizzle with melted butter and fried ham. Grate some cheese over the top and you’re done!